Thursday, January 31, 2013

Today's lunch


A few days ago, I've made Chapati Bread and I've put leftover uncooked dough into the freezer. Normally in Indian Restaurants, Chapati Bread (or flatbread) is normally served with some type of curry or a stew. Since I have leftover uncooked frozen Chapati, I decided to make Curry. This curry isn't authentic because the method of preparing this curry is different from Indian-inspired curry. I will explain why this isn't authentic in a bit.

The recipe that I've used today was from a YouTube channel called ochikeron. The recipe is called Basic Curry Rice, so clicking on the link the recipe is not authentic Indian curry; it is Japanese Curry. I've made my own changes to the recipe by adding in Chicken Drumsticks. I'll explain what I've done to the recipe to make it my own. 

First in the large pot, I've done what ochikeron instructed in the video. At the same time, I've preheated a large nonstick skillet over medium-low heat with a tablespoon of oil. Seasoned the drumsticks with salt, pepper, half a tablespoon of curry powder, and a dusting of flour (so the curry powder doesn't burn while it's browning in the hot skillet). When the skillet is hot, crane the heat to medium-high heat and place the drumstick in. Sear the chicken until all sides are browned, then set aside. In the large pot with the potato mixture, add in the water and the drumsticks together. Bring the pot to a boil and simmer on medium-low heat for about 15 minutes. At this point, I followed ochikeron's instructions until the very end. Serve over rice or with a side of Chapati Bread and lunch is served. 

Ochikeron used in her recipe called Vermont House Curry Sauce Mix. I buy my Curry Sauce Mix at my local Asian supermarket. I'm not sure if American supermarkets will have it, I haven't checked. 

Here are some photos:  


After making the curry and serving it on a plate, I cooked the Chapati Bread using a medium nonstick skillet and spraying it with nonstick cooking spray. Place the frozen dough onto the hot skillet and cook on both sides for a minute or until the dough starts to form big bubbles and brown. 

After scarfing the curry down, I've decided on small changes that might boost the flavor a bit more.
First, the chicken didn't absorb the curry powder, so I'm going to omit that next time. Additionally the flour made a mess in the skillet and it didn't help the curry itself, so I'm omitting it as well. At this point, I will brown the chicken until dark brown color so the end product is more appealing to the eye. In a traditional curry, chicken meats are usually "fall off the bone" tender. If you want "fall off the bone" tender, proceed with the same instruction above, but if you want the chicken to look appealing, put the chicken in the curry 8 minutes after the pot boils.

I will try this method next time I make curry. Leave any suggestions in the comment box.

Tomorrow I'm working on a different recipe, so subscribe to me for updates.

Tuesday, January 29, 2013

Leftovers...

Almost everyone has this happened to them when they make a new recipe; You first gather your ingredients and then you start to mix everything together. Suddenly you have leftover egg yolks (or whites), butter, milk, etc... As a inspired chef, I have to find ways to make those leftovers into something new and delicious. So for today, my leftover ingredient was egg whites. I made Dinner Rolls yesterday and the recipe called for egg yolks, so I put the egg whites into a separate container and then pop it into the fridge. Next day I decided I would try make Meringue Cookies. 

Meringue Cookies - made from egg whites and sugar. (That's it!)

The recipe that I found used the same amount of egg whites that was in my container, so I thought it was perfect to make these light and airy cookies. Here is the recipe

Now my pictures, the best part of my entire blog. Enjoy the food porn everyone!


I wanted to take a photo of them on a plate, but I didn't have a dark enough colored plate to highlight the white color of the cookie. The taste test for these cookies were interesting because when you break the cookies in half, they crumble into little pieces. Once you put these cookies in your mouth, it starts out being crunchy and then slowly it melts like cotton candy. So light and just the right sweetness. 

The only down side about making these cookies is if you use a piping bag, it gets really messy; really fast. At the end, my hands were covered with white fluffy meringues and when you work with meringue too long, they will stick to your hands. In addition to piping, I used a 1/4 inch round tip and it took some time to pipe them out, so either get a larger round tip or use 2 spoons like the recipe says. Its cleaner. But if you have special guest visiting, then pipe them out into a pretty design and serve it them. 

Let me know in the comment box what your leftover ingredient was and what did you do with them? I'd like to know! 

Monday, January 28, 2013

One of those days...

Today was one of those days where I wanted to get in the kitchen and cook up a storm! So I thought about it through and I wanted to make a couple of things. Namely Frost a Cake and Homemade Dinner Rolls. In this blog, all I've been showing are baked goods without any decorations. I wanted to show what I can do as  Pastry chef and maybe you can critic on my works. I'll put up some pictures of past works of cakes that I've made including the one I've made today. For today's cake, I didn't make enough frosting to cover the entire cake, but I adapted to meet the needs of my objectives for today.

Here comes the pictures!


This cake was made today, and it was unfortunately a boxed devil's food cake mix. So the frosting is homemade and really sweet. I've created the frosting using this recipe.I'd add less 10x sugar to make the frosting a bit less sweet. 

My past works are:

Green Tea Cake


Strawberry Green Tea Cake


That's all I've done that I remembered. So Let me know which one is your favorite. 

QUESTION: Can you tell the difference between the photo quality? For today's recipes, I decided to use my camera. The quality is a lot better than the iPad, but the only con is that I have the connect the camera to the computer with a USB, which takes longer than automatically updating into my Photo Stream Folder.

Now for my Homemade Dinner Roll, I couldn't help myself when they came out of the oven. I was drooling so fast. I hope you do too. The pictures are as followed:


The recipe is from Laura Vitale. I love her recipes because it has the right amount of seasonings in her dishes. I've used quite a bit of her recipes already. Now the Dinner Rolls were so SOFT, LIGHT, and BUTTERY! 
Best combination EVER!!!

In this recipe, I've changed how the method was written. Instead of using a stand mixer with a hook attachment, I used my hands and a wooden spoon. I used less flour than it called for. In this particular batch, I've used a total of 3 1/2 cups of all purpose flour. After mixing 3 cups of flour into the mixture, I pulled the sticky dough out of the bowl and then kneed in the last half cup until it wasn't sticky anymore. Afterwards, proceed with the rest of recipe as written. The result was a softer, lighter, and buttery roll. Serve it with the next family gathering and you will be giving this recipe away.

Please let me know down below whether you like my Camera's quality or iPad's quality. In addition to that, any tips or suggestions you'd like to share, please feel free to let me know.

Saturday, January 26, 2013

So for Today's lunch


Last night, I've made Meatloaf and had some leftovers. I wanted to make something to finish the leftovers, but I couldn't think of anything. After some much research around my binder full of recipes, I came across an AllRecipes recipe for Indian Chapati Bread. An Indian Chapati Bread is a flatbread made from wheat and all purpose white flour. 

Unfortunately having Meatloaf and a flatbread isn't enough because both of the components are dry, so I decided to make a Cheddar Cheese Sauce to bring everything together. The result was a somewhat healthier version (if I had some lettuce and tomatoes) of a Bacon Cheeseburger. The flatbread was crisp and crunchy, but still soft and pliable. Its similar to a Tortilla. If I had a piece of lettuce and tomatoes, the picture would look much better. Nonetheless, the product tasted good.


I mentioned above that Chapati Bread was made from Wheat Flour. The brand I used in my local supermarket was the King Arthur Whole Wheat Flour. 


Using my French rolling pin, I rolled the dough until it was flat as a tortilla. The dough is pretty easy to work with. 

Following the recipe, in a skillet, I place the flatten dough onto the pan and let it cook for about a minute. This is very quick and easy to do. It took about 40 minutes to complete finish everything.


Flipped it and it should look like this.


This recipe produces 10 medium sized Chapati Bread. I didn't cook the whole batch, so the TIP of the DAY is to place each Chapati between 2 wax papers and store them in the freezer for about a month. So any weeknight you don't have a starch on your place. Try this healthy alternative.

If you've cooked all the Chapati Bread, then you can let them cool completely, and store in the fridge in a plastic bag. Whenever you want to eat it, take them out and wrap a few in wet paper towel, then microwave them for 25 seconds. The result is a softer flatbread and you can wrap, dip, or tear anyway you want. The recipe for the Indian Chapati Bread is at the beginning of this post. Click it and let me know how your turned out.

Friday, January 25, 2013

An Almost All American Dinner!

Today, I decided to make dinner for my family, which included my Parents, Grandparents, Aunt, Uncle, and Little Cousin. I wanted to make something that goes well with silky smooth Whipped Potatoes. So I thought maybe Pan-seared Steak, Pot Roast, or Braised Short Ribs. Unfortunately two of them would take all day to make and one of them is very pricey for my budget. Since I'm on a budget and need a quick fix, I turned to Meatloaf. Not the most elegant dish, but it sure is quick cooking and cheap.

At the end of this post, I will mention how much I've spent on this meal that served 8 people with leftovers for tomorrow. So lets begin with the menu for tonight's dinner:

Entree: Meatloaf
Side Dish: Whipped Mashed Potatoes with Gravy, and Boiled Vegetable.

The dish looked something like this:

I put my own spin on the Meatloaf recipe, by placing a few thinly sliced bacon on top of the meatloaf, which kept it really moist and delicious. The overall dish was Delicious and very All American except for the Boiled Yu Choy. I will apologize for how the gravy was poured but the food still tasted delicious. 

Here are the other pictures I've taken of the Meatloaf:


Now for the pricing, the whole meal was about 25-30 dollars. Not so bad when it can feel 8 people. 

Let me know what is your go to "cheap and quick" meals. I'd like to learn and save some money while doing so. It's a win win situation!

Tuesday, January 22, 2013

My Love for Cantonese Cooking (5)


I haven't posted anything for the past few days because I haven't found anything interesting I can photograph, but I assure you that I'm still cooking. 

Today I wanted to make delicious Steamed Turnip Cake. Steamed Turnip Cake or Pan Fried Turnip Cake are common dishes in Dim Sum. I adore the Oyster Sauce that they pour out on the side of the plate. It pairs well with it for some reason. 

I have to give some credit to wantanmien. They provided the recipe for me to use and the end result was a soft, slightly bitter taste from the turnip cake. Its enjoyable. Especially when it was pan fried (Sorry I didn't take that picture, TOO DELICIOUS), the crust and the oyster sauce took it to a new level.

In the picture, you will see bits of dark red, black, and some light green. Those are the ingredients for the filling that I've mixed into it. They are my favorites. It consisted of Dried Shrimp (Re-hydrated), Dried Chinese Mushrooms (Re-hydrated), Chinese Sausage, Chinese Cured Smoked Belly, and Green Onions. The combination is good, but I will change the ingredients for the filling soon to incorporate Fermented Vegetable, and Fresh Ground Pork. The filling should be a lot "meat-er". 

The quality of the pictures are poor, I'm sorry. That's just the iPad 2 that I have. 


If you'd like to see me try to make something, Please leave it in the comment box below and I'd be happy to experiment with it. I think I need more inspiration from others. 

Friday, January 18, 2013

What I had for lunch today

Waking up today, I didn't think I wanted to make anything, but turns out I had to make lunch for my family. So I made a quick trip to my local supermarket and I picked a few ingredients to make my healthier spin of a classic Italian tomato sauce called Amatriciana. 

Before I begin, I wanted to show the picture of what I use at home to cook my sauces. I know it's not the best pot, but I use what I have just to save some money for more dishes to post on this blog. It also shows my stove, so all the dishes I've made, its her babies (and I'm the godfather haha). 


Now I know many people like to use their own type of tomatoes whether its fresh or canned, I'd like to show what I use for the past few months. Every tomato sauce that I've create that took about 30 minutes to put together, used Pomi chopped Tomatoes. You can check their site about their product, Pomi Product. Pomi isn't canned; it's actually in a paper container. (Very Green!) The product is good for quick sauces because they don't contain a ton of tomato juice that can dilute a quick sauce. Pomi also doesn't need much sugar, so if you like your pasta sauces a bit on the sweeter side, use this Pomi and you cut out on the calories from the sugar. Try it out. There's also another Pomi product that I've just came across; it's the Pomi Strained Tomatoes. I will one day try that product out to see if it makes a even quicker sauce. 


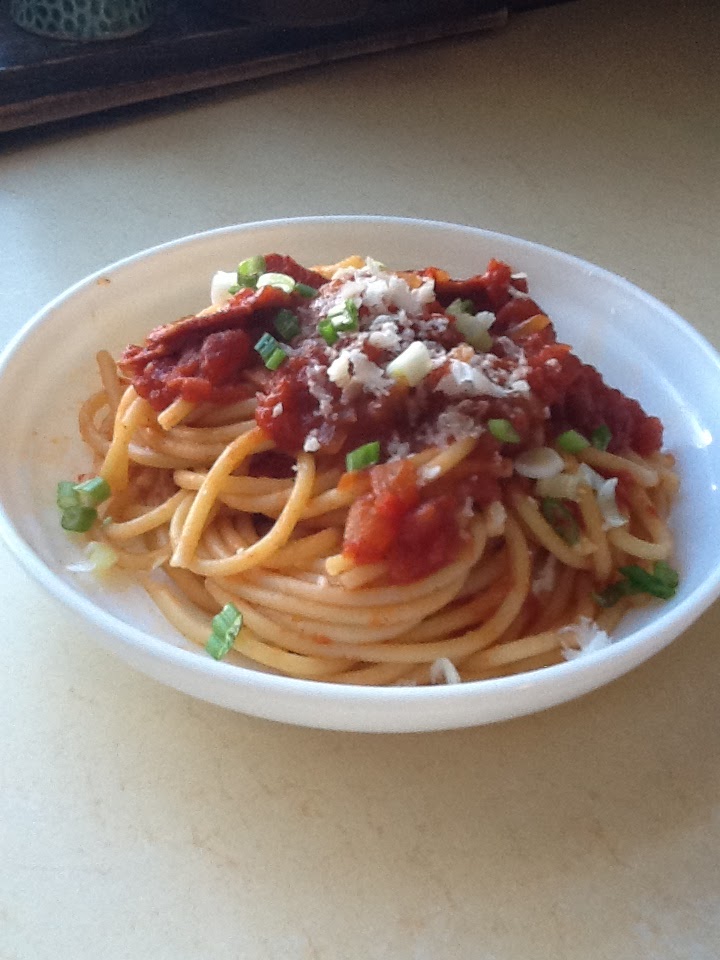
Now the final product of all that I've talked about, the Amatriciana. Amatriciana is a tomato based sauce that usually consist of cured pork cheek, Pecorino Cheese, White Wine, and Tomatoes. This is one of my favorite Italian pasta dishes and will try it anywhere I can. Unfortunately I didn't plan on making lunch and I couldn't get my hands on cured pork cheek, I simply used turkey bacon (I thought it would be healthier and it was on sale.) At the beginning I said that this isn't the traditional Amatriciana, so the turkey bacon was my first substitution. I didn't use Pecorino, so I used Parmigiano-Reggiano. I didn't have white wine at home, so I used leftover beef stock (just a splash). Lastly the tomatoes from Pomi. Those are all the ingredients for the dish that I've took pictures of below.


My apologizes, I forgot to mention one ingredient. The Pasta. This pasta is special because when I was young, I've learn that one pasta shaped can hold on to this thick and rich tomato sauce. The name of this pasta is called Bucatini. This long pasta actually has a small hole, which soaks up the thick sauce that a Amatriciana is. So in restaurant menus, you would see this dish written as Bucatini alla Amatriciana. I love it.

The green bits are finely minced scallions or green onions. They're just for decoration to make the sauce brighter and look appealing. If you were to serve this, please use finely minced parsley. The grassy flavor pairs better in this dish.

After lunch, I was bored, so I decided to make Double Chocolate Chip Cookies. These are really small cookies that pack a nice note of sweetness, and silky rich milk chocolate chips. I ate like 4 of them already. I used a tablespoon scoop and they flatten a bit, but they are so worth it. Best snack I've had in a while.


If you want the recipe of any dish above, leave me a comment and it will be up on the next post.